Affordable, DIY Lighting Tips and Setup Ideas for Photographing Paintings, Sketches, or Crafts
Photographing your artwork well is crucial—especially when you’re sharing online, applying to exhibitions, or listing on selling platforms. But not everyone has access to a professional studio. The good news? With a few affordable items and a bit of know-how, you can set up a highly effective home photography station that does justice to your work.
1. Choose Your Space Wisely
Pick a quiet area with minimal clutter and access to natural light. A north-facing window is ideal, as it provides consistent, indirect lighting throughout the day. If natural light isn’t available or reliable, no need to worry—we’ll cover artificial lighting shortly.
A neutral-coloured wall or a large piece of white card can act as a clean, distraction-free background for smaller works. For paintings or larger pieces, use a wall-mounted hook or a sturdy easel.
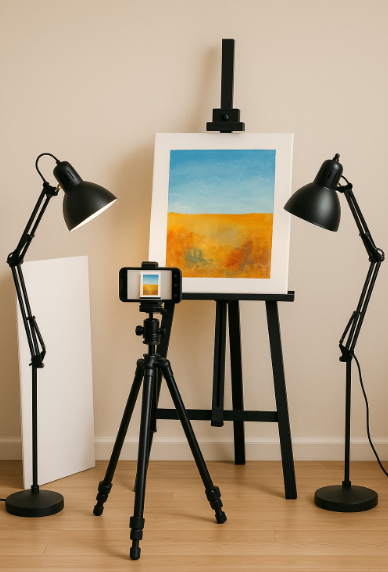
2. Light Is Everything
Good lighting is the most important factor in artwork photography. Here’s how to master it affordably:
Natural Light Setup:
- Shoot near a large window during daylight hours.
- Avoid direct sunlight—it creates glare and harsh shadows. Use thin white curtains or tracing paper taped to the window to diffuse the light.
- Position your artwork so the light comes from the side (at about a 45-degree angle), not directly behind or in front.
DIY Artificial Light Setup:
- Use two identical daylight-balanced bulbs (5000–5500K) in inexpensive clip-on lamps or desk lamps.
- Place one light on each side of the artwork, angled at 45 degrees, to minimise shadows and create even illumination.
- Avoid mixing warm and cool lights, as it can distort colours.
- Optional: Use sheets of white paper or baking parchment to soften the light and reduce harsh reflections.
3. Tripods and Stability
Camera shake can ruin even the best-lit photo. Use a tripod if you have one—or improvise with a stack of books and a phone mount. Most smartphones today have excellent cameras and can produce high-quality images, especially in good lighting.
Use your phone’s timer or voice command to avoid touching it when taking the shot.
4. Camera Settings and Angles
- Ensure the camera lens is parallel to your artwork—no tilting up or down.
- Use the gridlines on your phone or camera to centre and level the frame.
- Turn off the flash—artificial on-camera flash can cause bright spots and unnatural shadows.
- Shoot in the highest resolution possible.
If your artwork has texture (e.g., thick paint or mixed media), try a second angled shot to show depth, but use the straight-on image for cataloguing and sales.
5. Backdrop Tips for 3D Work or Crafts
For handmade items, sculptures, or textiles:
- Use a light tent or make your own with a cardboard box, white fabric, and a few lamps.
- Place items on neutral backdrops—white or grey work best. Avoid patterns or bold colours unless part of your aesthetic.
- Include a close-up shot to show detail and craftsmanship.
6. Quick Editing Tips
- Use free apps like Snapseed or Lightroom Mobile to straighten, crop, and adjust lighting.
- Keep edits minimal—your goal is to present your work accurately, not to enhance or alter it.
- Match colours to real-life tones. If you’re selling, colour accuracy is essential to avoid disappointed buyers.