- This topic has 0 replies, 1 voice, and was last updated 5 months, 3 weeks ago by
 .
.
-
Topic
-
This topic was automatically created for discussion of the article:
Discover the tools, tips, and simple techniques to turn blank paper into flowing colour.
What You Need to Start Watercolour Painting
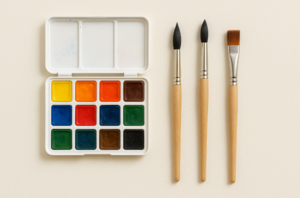
1. Paints
- Pan sets: Compact and portable; ideal for beginners.
- Tubes: Offer stronger, more vibrant colour; you can squeeze out only what you need.
- Student vs. artist grade: Student paints are cheaper, but artist grade offers richer pigments and better blending.
2. Paper
- Watercolour paper is essential — it’s thicker, textured, and absorbs water without buckling.
Look for 300gsm (140lb) or heavier.
Hot press = smooth surface; cold press (NOT) = lightly textured; rough = very textured.
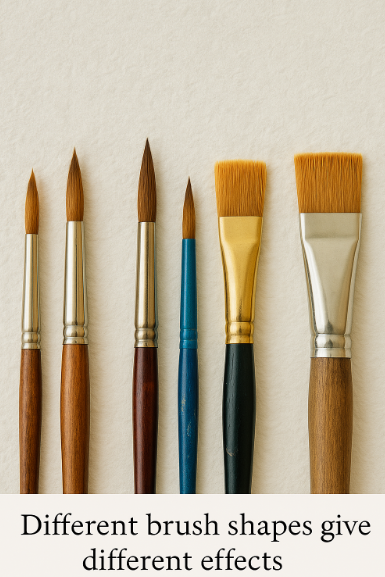
. 3. Brushes
- Round brushes (sizes 6–12) are versatile for most work.
- Flat brushes are great for washes and backgrounds.
- Natural hair (like sable) holds more water; synthetic is cheaper and cruelty-free.
4. Water containers
- One for rinsing your brush, one for clean water.
- Keep them separate so your colours stay fresh.
5. Palette
- Plastic or ceramic with multiple wells.
- If using pan paints, the case lid often doubles as a palette.
6. Other basics
- Pencil & eraser (soft, for light sketching).
- Paper towels or a clean cloth for blotting.
- Masking tape (to secure paper and create clean edges).
- Board (if you need to tape your paper flat).

The Rules (Best Practices) of Watercolour Painting
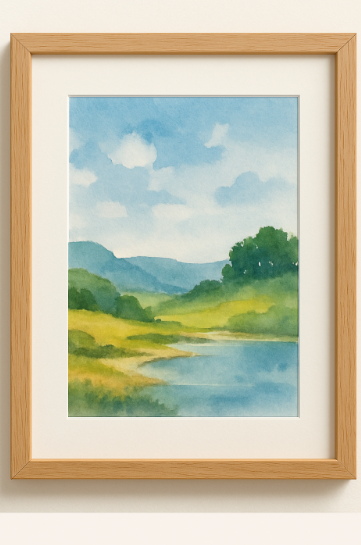
- A loose watercolour landscape showing
- good water control and layering.
- Work from light to dark
You can always add darker tones, but lifting light colour back out is tricky. - Let layers dry before adding more. This avoids muddy colours and keeps your work crisp.
- Don’t overwork the paper
Repeated scrubbing will damage the surface. - Water control is everything. Too much water = blooms/cauliflowers (unplanned watery effects). Too little = streaks and harsh edges.
- Test colours before using them on your piece
Keep a scrap of watercolour paper nearby for swatches. - Plan your whites
Watercolour doesn’t use white paint in the same way acrylic or oil does — you leave the paper white for highlights. - Mix colours on the palette, not the paper (most of the time)
- For smooth blends, mix before applying; for dramatic effects, allow some on-paper blending.
- Be patient. Rushing often results in muddy work; watercolour rewards a calm pace.
Beginner’s First Project: “The Three Washes”
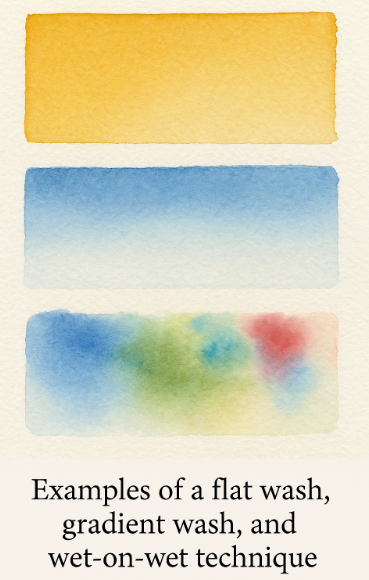
This exercise teaches you the three core watercolour techniques: flat wash, gradient wash, and wet-on-wet.
You’ll need:
- Watercolour paper (taped down
- A flat or round brush
- Two or three colours of paint
- Water and palette
Steps:
- Flat Wash
- Load your brush with diluted paint.
- Start at the top of your paper, painting a smooth horizontal line.
- Reload with more paint and work downwards, overlapping slightly each time until the block is evenly coloured.
Gradient Wash
- Load your brush with strong colour at the top.
- Rinse your brush slightly between strokes as you move down, gradually diluting the colour until it fades into white at the bottom.
Wet-on-Wet
- Wet a section of your paper with clean water.
- Drop in two or three colours and let them blend naturally without overworking. This creates soft, dreamy transitions.
Tip: Once dry, label each wash — you’ll be surprised how often you refer back to these practice sheets as you improve.
Share your image in the forum 🙂 CLICK HERE
🌟 Welcome back, Abbie!
Want to share something new with the community? You can:
- ✍️ Submit a Magazine Article
- 💬 Join the Forum Chat
- 📬 Check Your Inbox
- Share this link with your friends if you enjoyed the post 🙂 See the share buttons below
Read the full article: https://ourartsmagazine.com/blog/so-you-want-to-watercolour-lets-begin-the-journey/
—
Source: Our Arts Magazine⋱⋰⋱⋰⋱⋰⋱⋰⋱⋰⋱⋰⋱⋰⋱⋰
Site Owner • Community Manager
Artist • Authoress • Autistic •
Lover of Wolves, Woods, and Wild Places
⋱⋰⋱⋰⋱⋰⋱⋰⋱⋰⋱⋰⋱⋰⋱⋰