First, I must apologize for being late with this blog post. I try to write one every 4-5 weeks, but unfortunately that didn’t work this time around. I have an excuse though, I had to design a brand new website for “Rudy Umans Imaging”. My old website was designed in an old desktop program called “Webplus” by Serif, yes, the same company behind the popular “Affinity” line of programs. Serif also hosted my site, so everything was in one hand. Until they decided to go the “Affinity” route that is. They stopped their hosting service, and they stopped supporting their “Legacy” line of programs, which Webplus was part of. I kept it going for a while with another hosting company, but that became expensive, at least too expensive for what I got out of it. Webplus also became a little bit outdated and tired looking. It was time for a change and time to search for a better solution! Everything I found in my search had something I didn’t like. It was either too expensive, too complicated, too this, or too that and I was getting a little frustrated
My friend Abbie to the rescue! She is a WordPress expert and she suggested WordPress to me. She offered graciously to help me with setting things up, getting familiar with WordPress, and to host my new site on her server. This was an offer I couldn’t resist, and the searching stopped and the learning began. Now you must know, that designing and publishing websites is not really my cup of tea. Designing the page layouts and creating content is one thing, but all those technical “behind the scenes” bits, they can keep. Looking back though, it was more fun than I expected. I also learned a lot during this whole adventure. Maybe you would like to hop over to my new site www.rudyumans.com after you are done reading this great magazine from A to Z. Maybe you like to leave a comment, or like to sign up for the newsletter, so you stay informed about new blogs or other noteworthy news! Your Emails are safe, and I won’t bombard you with too many emails about whatever you don’t want to hear.
Phew, we got that out of the way. Back to our regular schedule
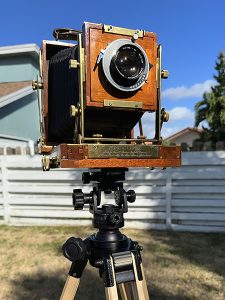
The plan was to write a blog about what is in my camera bag, a popular subject for photography bloggers and YouTubers, and a separate blog about the operations of some of the cameras and lenses I use. However, I like to be modest about my equipment. It is all pretty common in my world, and they are tools, not trophies. There would also be a big overlap between the two blogs. It is not possible for me to write about one and not the other unless I just want to give you a list of equipment without any other information, but who wants that? Boring!
Many of you might have noticed me mentioning terms on social media or in other blog posts like “4×5”, “Large Format”, “Medium Format”, and similar terms you might, or might not, be familiar with, but what does all that mean? It can get confusing, so I think I should explain film formats first for readers who are not familiar with the terminology.
The most common film format is 35mm. Everybody over a certain age is probably familiar with 35mm. During the film era, the vast majority of camera owners had a 35mm camera, this film came as a roll tucked away in a cassette. All you had to do was pop the film into the camera, pull out some film from the cassette and attach it to a spool at the other end of the camera and off you went. The negative size is 24 x 36mm. This film is still readily available in color (negative and slide) and black and white.
Next size up was 120 film. (Notice there is no mm after 120) This film is also on a roll, but unlike 35mm, not tucked away in a cassette. Loading the film into a camera is just as simple as with 35 mm. You put the film on one side of the camera, unroll a little bit of film, and mount it on an empty spool on the other side. Common negative sizes for 120 film are 6 x 4.5cm, 6 x 6cm, 6 x 7cm, and 6 x 9cm. There are other sizes, like 4 x 4cm, but the former are the most common ones. Notice that 6 is the magic number here, it is the standard width for 120 film. This film is also still available in color (negative and slide) and black and white.
Next format is the “Large format” domain. Although the opinions about what “Large format” exactly entails are somewhat divided, the general consensus nowadays though are the 4 x 5”, 5 x 7”, and 8 x 10” film sizes. Obviously, these sizes are too large for a roll of film as used with smaller formats, so this film comes in sheets. These sheets need to be loaded into a holder, something that needs to be done in the pitch dark. Each holder holds two sheets of film, one on each side.
I mainly use the 4 x 5” format. To me, it is the perfect format. Not too big, not too small, and not too heavy. 5 x 7” is only 1.75 or so larger than 4 x 5”, while 8 x 10” is four times larger than 4 x 5”, but with ten times more problems. (And a lot more ibuprofen for my poor lower back!!)
After Large format, there is Ultra Large Format. Basically, every size from 11 x 14 inches and up. This is very specialized and very expensive. The cameras look and operate the same as the 4 x 5” and 8 x 10” ones. I don’t have this format, so we will save this for another day.
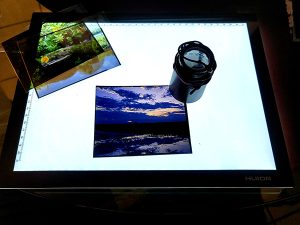
Some transparencies on a lightbox for inspection
You might have noticed that centimeters and inches are both used in photography in the U.S. Even though I don’t really know why, I think that international and government standards have something to do with that, and hard-to-die habits, but I am not 100% sure. All I know is that in the U.S. large format and photo paper sizes are always in inches. Small format is always in centimeters, and medium format is user choice, but mm and cm are more common. Lenses however, except for some very old lenses, are always metric and usually in millimeters and sometimes in centimeters.
Until about a year ago, my favorite “walk around” camera was a medium format (6 x6 cm) 1958 Rolleiflex 3.5E, first generation, but thanks to my utter stupidity, that camera took a tumble on the pavement. The result was that the viewing hood was all bend out of shape. I was able to replace the viewing hood, but it still doesn’t work right. It seems that the focusing mechanism it out of alignment, at least, I have a hard time focusing it now. I can have this repaired, but it will cost me around $4-500, and I am not sure if I want to spend that kind of money on that camera right now. Also, if you open up a 65 year old camera, you take the risk of opening up a can of worms and the whole thing might turn into a bottomless money pit.
Instead of pouting over it (I did a little, I am still human), I took the opportunity to rethink my whole camera strategy. I was always much more into quality over quantity, and I was never a “shoot-from-the-hip” kind of guy. I know people who come home with 6-700 images on their memory card at the end of an afternoon shooting, which is mind boggling to me, there is no way I could do that. Even when I still worked with digital, I would come home with only a handful of images if I was lucky. I never bracketed either, never saw the need, we photographers are supposed to know how to calculate the correct exposure, are we not? (Bracketing is capturing the same subject with a sequence of exposures of which you pick the best one later in the comfort of your living room) To be honest, If I would have to shoot like Machine Gun Kelly, photography would burn me out in less than a week! My philosophy is: quality first, no need to go the easy route. Go big or go home, so, I decided to go large format all the way.
Without further ado, here we go
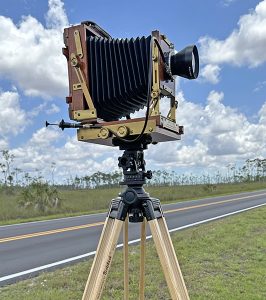
The flagship
Enter the world of the wooden field camera. There was a time that the wooden field camera was the most common one for outdoor field work. There are still a lot of them around and they are quite popular in the outdoor large format photography world, as a matter of fact, the last number of years, several new manufacturers popped up. Some of these are low cost entry level cameras that really helped many enthusiasts in their decision making process, whether to take the step to large format or not. So even though sales are up, it is only a small percentage that sticks with it though. Many give up after they find out what being a large format photographer really means. The whole image making process with these cameras is not for the impatient personalities and not for the faint of heart. I made my decision back in 1992. In that year, I bought my first wooden field camera. It was my only camera from 1992 until 2008, when I went digital until 2018
My camera is a wood and brass Zone VI “Classic” 4 x 5”. This camera was a joint venture of two well-known individuals in the wooden field camera world in the eighties and nineties, Fred Picker and Ron Wisner. Ron Wisner was more the craftsman. He knew optics, he was a master machinist and a master woodworker. He designed and built harpsichords, organs, and cameras. Fred Picker was more the businessman type. Both were also well accomplished photographers, and for sure knew what they were talking about as far as these types of cameras go. Fred Picker was already selling a (by him) modified Japanese made camera with the Zone VI name and was in the camera equipment business since 1972. For both men, the “Classic” was more an evolution than a new design from scratch. Anyway, these two men met each other in 1985, and they decided to form a partnership to build a better camera than the best available wooden field camera at the time, the Deardorf. They figured out what they didn’t like about it and wanted to design a functionally improved version of that camera that also had to be more beautiful. The result was a great camera, and very different than the Deardorf. Unfortunately, it happened that these two men were both very outspoken with strong personalities, so that partnership only lasted three years from 1985 until 1988. During that time, less than 100 of these cameras were built by Ron Wisner, who was the designated manufacturer. The serial numbers ran from 100-250. I have s/n 247, so I assume it was built in 1988. I have Fred Picker’s lengthy write-up about the history and the design of the camera, which is for me a real treat to read, I don’t know if it is better than the Deardorf (which is also twice as expensive), but with its beefier quarter sawn Honduras mahogany wood and brass hardware, it is definitely more beautiful and even after 35 years or so, it is still as smooth and precise as a new one. To me, the camera is very special and a real pleasure to work with. Every time I take it out of my camera bag, it feels like coming home.
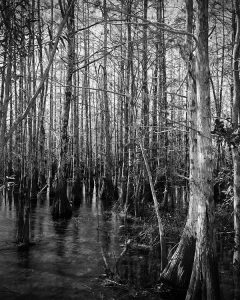
Zone VI Classic. Everglades National Park.
Available here: https://rudy-umans.pixels.com/featured/cypress-head-everglades-b-w-rudy-umans.html
So, what makes a wooden field camera like mine so special? Well, first of all, most of these cameras are a work of art. They are for 99% handmade by very skilled craftsmen. The wood is beautiful, the construction is remarkably precise, and over all, they are a real pleasure to behold and to work with.
The second reason is the simplicity of the design. There are the different designs out there pertaining to the operations of the camera, but they all have in common the 3 main sections of the camera body: the bed, the front standard, and the rear standard. It is possible to disassemble these 3 sections for maintenance. In order to make the camera complete and workable, you also need three “attachments”: a ground glass, a bellow, and a lens. The ground glass (more about the ground glass later) sits in a wooden frame that also holds a spring mechanism to hold the film holder in place when mounted on the rear standard. The lens is mounted on a lens board which is mounted on the front standard. The front and the rear standards are mounted on a bed. The bed has a focusing mechanism of some sort so you can move either the front or the rear standard, or both, depending on the design. In between the front and the rear standard is the bellow to make the whole thing a light tight box.
That’s it, three sections and three attachments, completely modular, and no screwdriver needed to take it apart and put it back together again.
The third and most important reason is “movements”. What are these “movements”? Unlike with the cameras most are familiar with, the lens and the back of the camera are not fixed. You can “move” them. You can raise or lower the center of the lens in relation to the center of the film. You can also tilt the lens forward or backward, so the lens is no longer parallel with the film. You can swing the lens, which is the same as tilt, but sideways and you can shift the lens, which is the same as rise and fall, but over an horizontal plane instead of a vertical plane.
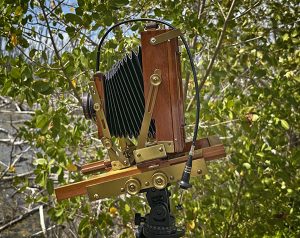
Notice that the bed is pointed downwards while the lens and the film plane remain parallel to the subject. Since I used a lens fall with a wide angle lens, I pointed to bed down to avoid that the out edges might be visible in the frame
The rise or fall is used for perspective control. No more falling or leaning tall buildings. Without pointing the camera to the top of a tall building and thereby creating distortion, you can leave the film parallel to the building, and by raising the lens you get still the whole building from top to bottom. Some might say, I can make perspective corrections in photoshop, and they are right, but it is not the same. Controlling this with the camera, is what you see is what you get. Correcting it in photoshop is a little bit of a gamble and you will need to leave a lot of room around the subject because photoshop will cut it off, and you don’t know beforehand to what extent.
The second most used movement is tilt. With tilt, you can control Depth of Field or DoF (what part of the image is sharp). With a fixed lens camera, this is controlled by the aperture, the smaller the aperture (bigger number) the greater the Depth of Field. This has limitations and can create technical problems if the aperture gets too small (Diffraction). With the field camera you can control the Depth of Field with tilting of the lens. Normally, the lens is parallel to the film plane, but by rotating the lens on its horizontal axis or at the base, one can change this and by doing so, one can get an image sharp from front to infinity with a relatively large aperture (f/8 for instance). This works best with open fields like grasslands or something like that. If there are too many tall subjects in the scene, you might get distortion. I think it goes too far for this blog to go into this. This is not a lesson about the ins and outs of Depth of Field and photographic planes (there are at least 5, but for people who are curious, look up “The Scheimflug Principle”. The Scheimflug principle is one of the first things any large format photographer learns (or should learn).
I can also tilt the back of the camera, which creates some distortion of the subjects. It makes them larger or smaller. For instance, If I want to emphasize some rocks in the foreground, I can tilt the back of the camera a little bit backwards, which makes those rocks a little bit more pronounced.
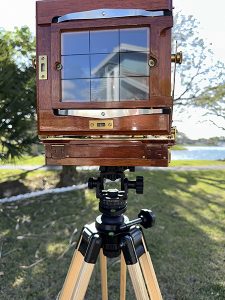
This brings me to one other major advantage of the large format camera: The ground glass! The ground glass is the original and ultimate life view! It is a piece of frosted glass, a little bigger than the film, mounted in a frame, which is attached to the back of the camera so the photographer can see what he or she is doing.
Light coming through the lens is directly projected on the ground glass, no mirrors or prisms. There is nothing but air between the lens and the ground glass. This means that what you see is upside down and left to right reversed. It also means that what you see, is what you get. All the movements, depth of field, focus, etc. are immediately visible on the ground glass. Like I said, the original and ultimate life view! That upside down and reversed bit, is something you have to get used to, but that doesn’t take long and is by many actually considered an advantage. It helps with composing the image by making it easier to create a balance in the composition. If it looks good upside down, it will definitely look good right side up. It has been said that Henry Cartier Bresson used a special prism on his 35mm Leica to see his subjects upside down and reversed. I believe that the famous German photographer Andreas Feininger did the same thing. Not sure if that is true or not.
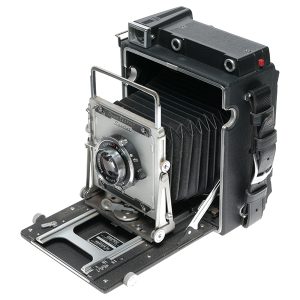
Graflex Crown Graphic 45
Graflex was an American manufacturer of press cameras. The Company was founded in 1887 by the Folmer and Schwing Manufacturing company. For the first half of the 20th century, it was for the most part owned by Kodak. These were the glory days of the company. After Kodak, the company changed hands a number of times. The last company to own it under the Graflex name was the Singer Corporation, the sewing machine people. Singer sold the company, including all machinery and tooling, to Toyo Co., Ltd in Japan in 1973. Toyo still sells cameras based on the same design as the Graflex Super Graphic, which was more advanced, but similar to their two most popular models: the Speed Graphic and the Crown Graphic.
The camera is made of wood (mahogany) and metal. It folds up to a small package of about 6.5 x 7.5 x 3 inches. There is no shutter in the camera body. Graflex did make one with a built in shutter, the Speed Graphic, but the Crown Graphic has only a shutter built in the lens. It is a “Press Camera”, meaning it was designed for press photographers who operated the camera handheld in fast action situations. For that reason, the movements are a lot more limited than with the Zone VI. It has a mechanism to operate the (lens)shutter from the camera body, a wire frame as a viewfinder, which is surprisingly accurate, and a leather strap for handholding. It also has a rangefinder, which is a mechanism with mirrors and a prism that is connected to focusing mechanism on the camera itself. It shows two images of part of your subject that need to be aligned. Once they are aligned, the image is in focus.
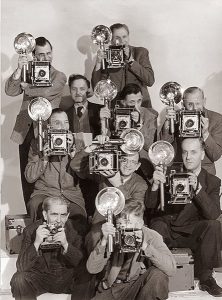
No need for a loupe to check focus on a ground glass (as with the field camera) All these features were designed for speed and handholding convenience. If you ever saw a picture or a movie from the fifties with a bunch of shabby looking cigar smoking photojournalists holding big shiny cameras, there is a good chance those were either a Graflex Speed or Crown. There were other manufacturers of similar cameras, but Graflex was the most famous and the standard.
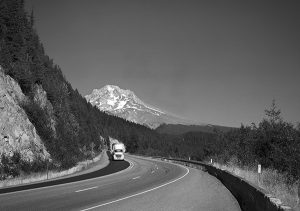
Mount Hood, OR. Handheld Snapshot with the Graflex Crown Graphic.
Available here: https://rudy-umans.pixels.com/featured/route-26-oregon-rudy-umans.html
For a press camera that requires fast action photography, it would be a pain in the rear tootsie if you could only use film holders that hold two sheets of film. A photojournalist would need to take an awful lot of holders to capture a major event, or just for a day’s work. To solve this problem, Graflex came up with something that is called a “Film Pack”. The packs are metal boxes, made to fit the back of the cameras and hold 6 sheets of film. The sheets have each their own skinny holder, called a septum, and thanks to a very ingenious mechanism, the septums can rotate inside the box without opening the box so that an unexposed sheet of film is always on top. I use these packs with my Crown Graflex. They are my six-shooters as I call them.
These film packs are optional units that needed to be purchased separately. It is very much possible to use the camera with regular 2 sheet film holders and a ground glass.
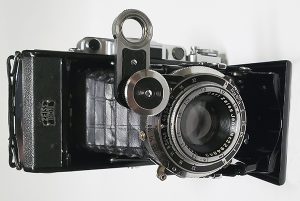
For the occasions that this camera is simply too cumbersome or obnoxious, I have a 1938 Zeiss Ikon, Super Ikonta 531/2 – 6 x 9 (cm), which is a small medium format folding camera, built like a tank, very clean looking, and still works like new. It’s a rangefinder, like a Leica, but different. It has a fixed uncoated 10.5cm lens. Because it is uncoated, I usually have a yellow filter attached to the lens to increase contrast with black and white film.
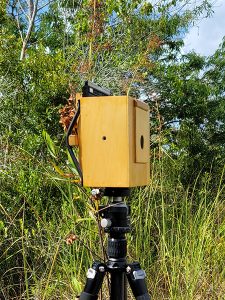
Snapdragon 45, handmade by Kent Nunamaker. Notice the shutter, which is in a closed position in this image. If you look closely, you will see the film holder in the back.
The Pinhole
I will skip the whole technical part about pinhole cameras and pinhole photography, as I wrote a whole blog post about that. My main pinhole camera is a large format 4 x 5” camera that looks like a birdhouse. It is just a wooden box with a pinhole on one side and a place to put the film holder on the other. The camera is made by my good friend Kent Nunamaker, who had a small production line of these cameras in the mid-nineties under the name “Snapdragon”. The pinhole is punched out with a needle. The pinhole was then carefully “deburred”, which is the removal of small imperfections and the smoothing out of the edges of the hole. This is an art that Kent perfected. So far, the quality of the pinhole is unequaled, and the quality of the pinhole images is fantastic. If I line up a number of pinhole photographs made with the different cameras, the images made with this camera stand out and people seem to prefer them over the other ones, which is fine with me. It’s my favorite pinhole camera. The focal length is 75mm (3 inches), which is about 21 mm wide angle in 35mm film equivalent. (Full frame for digital.) The film holder is held in place with rubber bands made from a vacuum cleaner belt, which makes sense. They are strong, durable, light weight, and easy to replace if needed.
That’s it as far as my currently active pinhole camera is concerned. I have some others, but the Snapdragon 4 x 5” is my favorite that I use the most by far. If I could only have one camera, that would be the one. Who knew you could take pictures with a birdhouse?
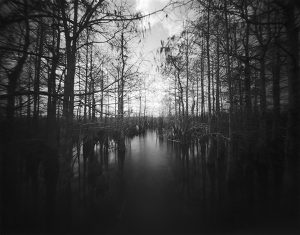
Snapdragon 45. Everglades National Park.
Available here: https://rudy-umans.pixels.com/featured/everglades-florida-pond-cypress-trees-rudy-umans.html
So that were my main cameras in a nutshell. It is hard to summarize all the ins and outs of these cameras into something digestible, but I hope you got the idea. I included some pictures here because after all, a picture says more than a thousand words.
The lenses
Large format lenses are not like the lenses designed for other formats, they determine the extent of the possible camera movements. How much rise or how much tilt I can achieve is directly related to the design of the lenses I use.
All lenses (yes, yours too) produce a round projection of the subject. This projected circle is appropriately called the “Image Circle”. The diagonal of your sensor or film size must be equal or smaller than the diameter of this circle.
For 35 mm, the minimum image circle the lens must produce is 44mm. For 4 x 5” sheet film, this is about 150mm. If the image circle is smaller than the diagonal of your sensor or film, you will get vignetting, meaning the corners will be darker. Of course, with 35 mm or medium format with fixed lens mounts, you don’t have to worry about it. (35mm tilt/shift lenses are an exception). These potential problems are taken care of. That is not the case with large format cameras if you want to take advantage of the movements as we discussed. In order to be able to raise, fall, tilt, or shift the lens, the image circle of that particular lens has to be significantly larger than the diagonal length of the film. For instance, a lens with an image circle of 200 mm, leaves a space of 25 mm on either side to move around in.
I have currently 4 lenses in my camera back: a Nikkor-T-ED 360mm f/8, a Schneider Kreuznach 120mm f/8, a Komura Commercial 210mm f/6.3, and a Rodenstock Sironar-N 150mm f/5.6
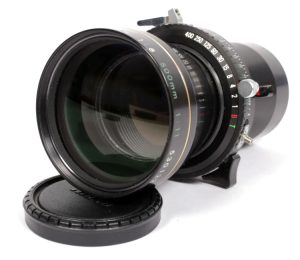
Nikkor-T-ED 360mm f/8
Keep in mind that to get the 35mm equivalent focal lengths, you will have to divide these focal lengths by 3.
Lenses for large format consist of 3 sections: a front element, the shutter, and a rear element. All controls, such as aperture, shutter speed, flash synch etc. are done directly on the shutter. The camera has no controls other than focusing and the movements we talked about. The shutter is the main control panel so to speak.
Most shutters for large format lenses have a “B”, and a “T” setting with shutter speeds ranging from 1 sec. to 1/500 second or less, depending on the type and age of the shutter. There can also be a PC terminal for an external flash or strobes, depending on the type and age of the lens. Because the shutters are of the leaf shutter type, the sync speed for flash and strobes can be set at any speed. Apertures have no stops and are set manually with a slider. There is a switch to open the shutter so you can see what is in front of you through the ground glass. This switch keeps the shutter open until you close it manually. In other words, if the film holder is on the camera and you are ready to go, but you pull the dark slide out of the film holder before you close the shutter with this switch, you just wasted a sheet of film. The maximum aperture depends on the lens, but the most common ones are either f/5.6. f/6.3, or f/8. The most common smallest apertures are either f/48 or f/64.
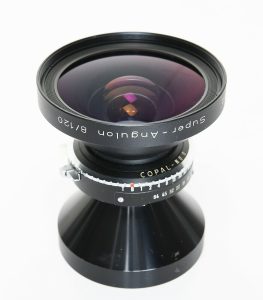
Schneider Kreuznach 120mm f/8
The Tripod
My tripod is made of ash wood and bought directly from the manufacturer Berlebach in Germany. Ash wood is the best material to eliminate vibrations, after all, one never knows when that herd of Brontosauruses will show up deep down in the bowels of my favorite stomping ground, the Everglades. For my lightweight pinhole cameras, I use a simple lightweight tripod.
The light meter
Although I could theoretically do without a light meter, it is not exactly a gadget for my type of photography. I like to measure the scene accurately for the film I use. Often, I also use filters, which add time to the base exposure, and I have to deal with reciprocity factors (see my blog about Pinhole photography). Consequently, with both the 4 x 5” and the pinhole, I run inevitably into long exposure times on a very regular basis. So, a simple and accurate meter is a very good thing to have. I use a Pentax 1 degree spot meter. It is somewhat small, lightweight, a joy to use, and accurate.
Sundries
I also need a few other things, such as: focusing cloth, which is a dark cloth to throw over my head so I can see what’s on the ground glass; a cable release; a 4x focusing loupe to check the focus on the ground glass; filters for Black and White; a small towel, what I consider a “must have”; a notebook and pen; a flashlight; and a small screwdriver for small adjustments or repairs. For both my Graflex press camera and my pinhole cameras, I don’t need the focusing cloth nor the loupe.
Developing
I do all film developing myself. Mainly because my wife thinks I look cute in my apron, but also because it is fun, I have more control over the whole process, and it saves an awful lot of money.
That’s it. Hopefully it wasn’t too boring. Before I go though, I like you to know that even though I love my equipment, I am not married to it. I like to take pictures in a certain way and this equipment helps me with that. As said, if I could only keep one camera, it would be my little wooden birdhouse.
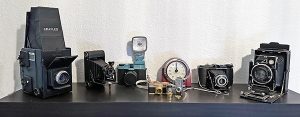
A small selection of my vintage cameras. All these cameras work and are in great shape. They are used on a regular basis, except for the little spy cameras in the front. The clock in the back is a vintage Kodak darkroom timer.
If I may, I will end this blog with a short word of wisdom:
“It doesn’t matter what you have, what matters is what you do with it” – Me
This was the second somewhat technical blog about equipment and that should be enough for a while. The next blog will be, most likely, about the revival of pictorialism.
Until then,
Rudy Umans.
August 19,2023
rudyumans.com
Pixels.com
Notes:
Images and text that are created by the author of this article enjoy copyright protection as defined by the laws of the United States and the rules of the World Intellectual Property Organization (WIPO) of which the United States is a member. All other images and quotes are used under the “Fair Use” doctrine. (Educational)
This essay was 100% written by me. No Artificial Intelligence whatsoever was used. That includes all the typos and grammar mistakes that only humans are allowed to make.


Again an fabulous post. I am so glad you have settled with your new site. It does look amazing!
I agree with your wife, perhaps not you especially but I have to admit to having a penchant to a guy who does not mind an apron.
Fantastic post and thank you for sharing this knowledge
Thank you very much Abbie! Love to share the little bit I know!
A most pleasant read. You present some interesting details about your equipment and its history. But most fascinating to me is what you tell about yourself. Your article is as much autobiography as photo equipment lore.
I very much enjoyed learning about what you value, what you use, and how handling these wonderful instruments makes you feel. You also brought back some pleasant memories from days past. I also loved the reversed image in the Rolleiflex viewfinder for the abstraction that it provides, making the photographer deal with the image, not the reality in front of the camera.
Thank you for opening your bag – and a little bit of yourself.
Thank you very much Ludwig! It makes me happy that you enjoyed the post!