This topic was automatically created for discussion of the article:
This article contains affiliate links. If you click and buy, I may earn a commission at no extra cost to you.
5 Charcoal Picks for Artists – Compared (2025)
From rich compressed sticks to tinted XL blocks, here’s a closer look at some of the most popular charcoal options for drawing and sketching.
Charcoal is one of the oldest and most expressive drawing mediums, valued for its deep, velvety blacks, subtle tonal range, and versatility. From quick, energetic sketches to highly detailed portraits, it offers artists the freedom to create bold lines, soft shading, and dramatic contrasts with ease.
There are several types of charcoal to explore — natural willow and vine for delicate, erasable marks; compressed sticks for rich, intense blacks; and tinted or mixed varieties for adding subtle colour accents. Charcoal can be used on its own or combined with other media, and works beautifully on textured papers that grip the pigment.
While it can be a little messy, a few simple tools — such as a kneaded eraser, blending stumps, and a workable fixative — will help you control your work and preserve your drawings. Whether you are a beginner experimenting with mark-making or an experienced artist refining tonal technique, charcoal remains a timeless and rewarding medium.
Beginner’s Quick Guide to Charcoal
1. Choose Your Charcoal Type
Willow or Vine – Soft, natural sticks that create light, erasable marks. Perfect for gesture drawings and under-sketches.
Compressed – Denser sticks that produce darker, bolder lines and shadows. Ideal for dramatic contrasts.
Charcoal Pencils – Encased in wood for cleaner handling and precision work.
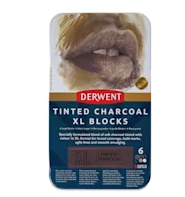
Tinted Charcoal – Adds subtle colour to your work while keeping the texture and bendability of traditional charcoal.
2. Pick the Right Surface
Charcoal works best on toothier papers (medium to heavy weight) that can grip the particles. Popular choices include:
Cartridge paper (general use)
Textured watercolour paper (for richer marks)
Pastel paper (especially for tinted charcoal)
3. Holding & Mark-Making
Overhand grip for broad, sweeping strokes and shading.
Pencil grip for fine lines and detail.
Use the side of the stick for wide, soft shading, and the tip for sharper lines.
4. Blending Techniques
Finger smudge for soft transitions (messy but effective).
Blending stumps or tortillons for more controlled blending.
Tissue or chamois for large, smooth gradients.
5. Erasing for Effect
Kneaded eraser to lift charcoal for highlights or to lighten areas without damaging the paper.
Hard eraser for crisp edges and clean whites.
6. Fixing Your Work
Charcoal smudges easily, so apply a workable fixative to protect the surface.
Spray lightly from a distance to avoid darkening the drawing.
Use in a ventilated space.
“Workable” fixatives allow you to keep drawing on top after application.
7. Practice Ideas
Value scales to explore tonal range.
Still life studies to practise shading and depth.
Quick gesture drawings for movement and expression.
Tip: Keep a small scrap of paper under your drawing hand to avoid accidental smudges, and don’t be afraid of mess — charcoal’s expressive quality often comes from its unpredictability.
COMPARISON
How I choose
When selecting charcoal for this list, I looked for tonal range, consistency of mark-making, ease of blending, dust control, and surface feel. I also considered availability in the UK and USA, and feedback from artists working in both fine art and quick sketching styles.
Not a member yet? You can still share your creative voice with our readers. We welcome guest posts from artists, writers, and creative souls of all kinds.
We use cookies to ensure that we give you the best experience on our website. If you continue to use this site we will assume that you are happy with it.AcceptPrivacy Policy
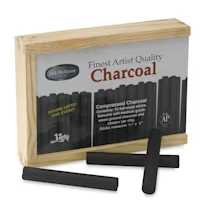 1. Richeson Charcoal
 2.
2.  3.
3.  4.
4.  5.
5.